Getting Started With Mastodon
Tutorial written by tikli. Also available as a Mastodon thread and a Twitter thread.
Page last updated on 22 September 2023 [change log].
Contents
Part 1: Choose a Server
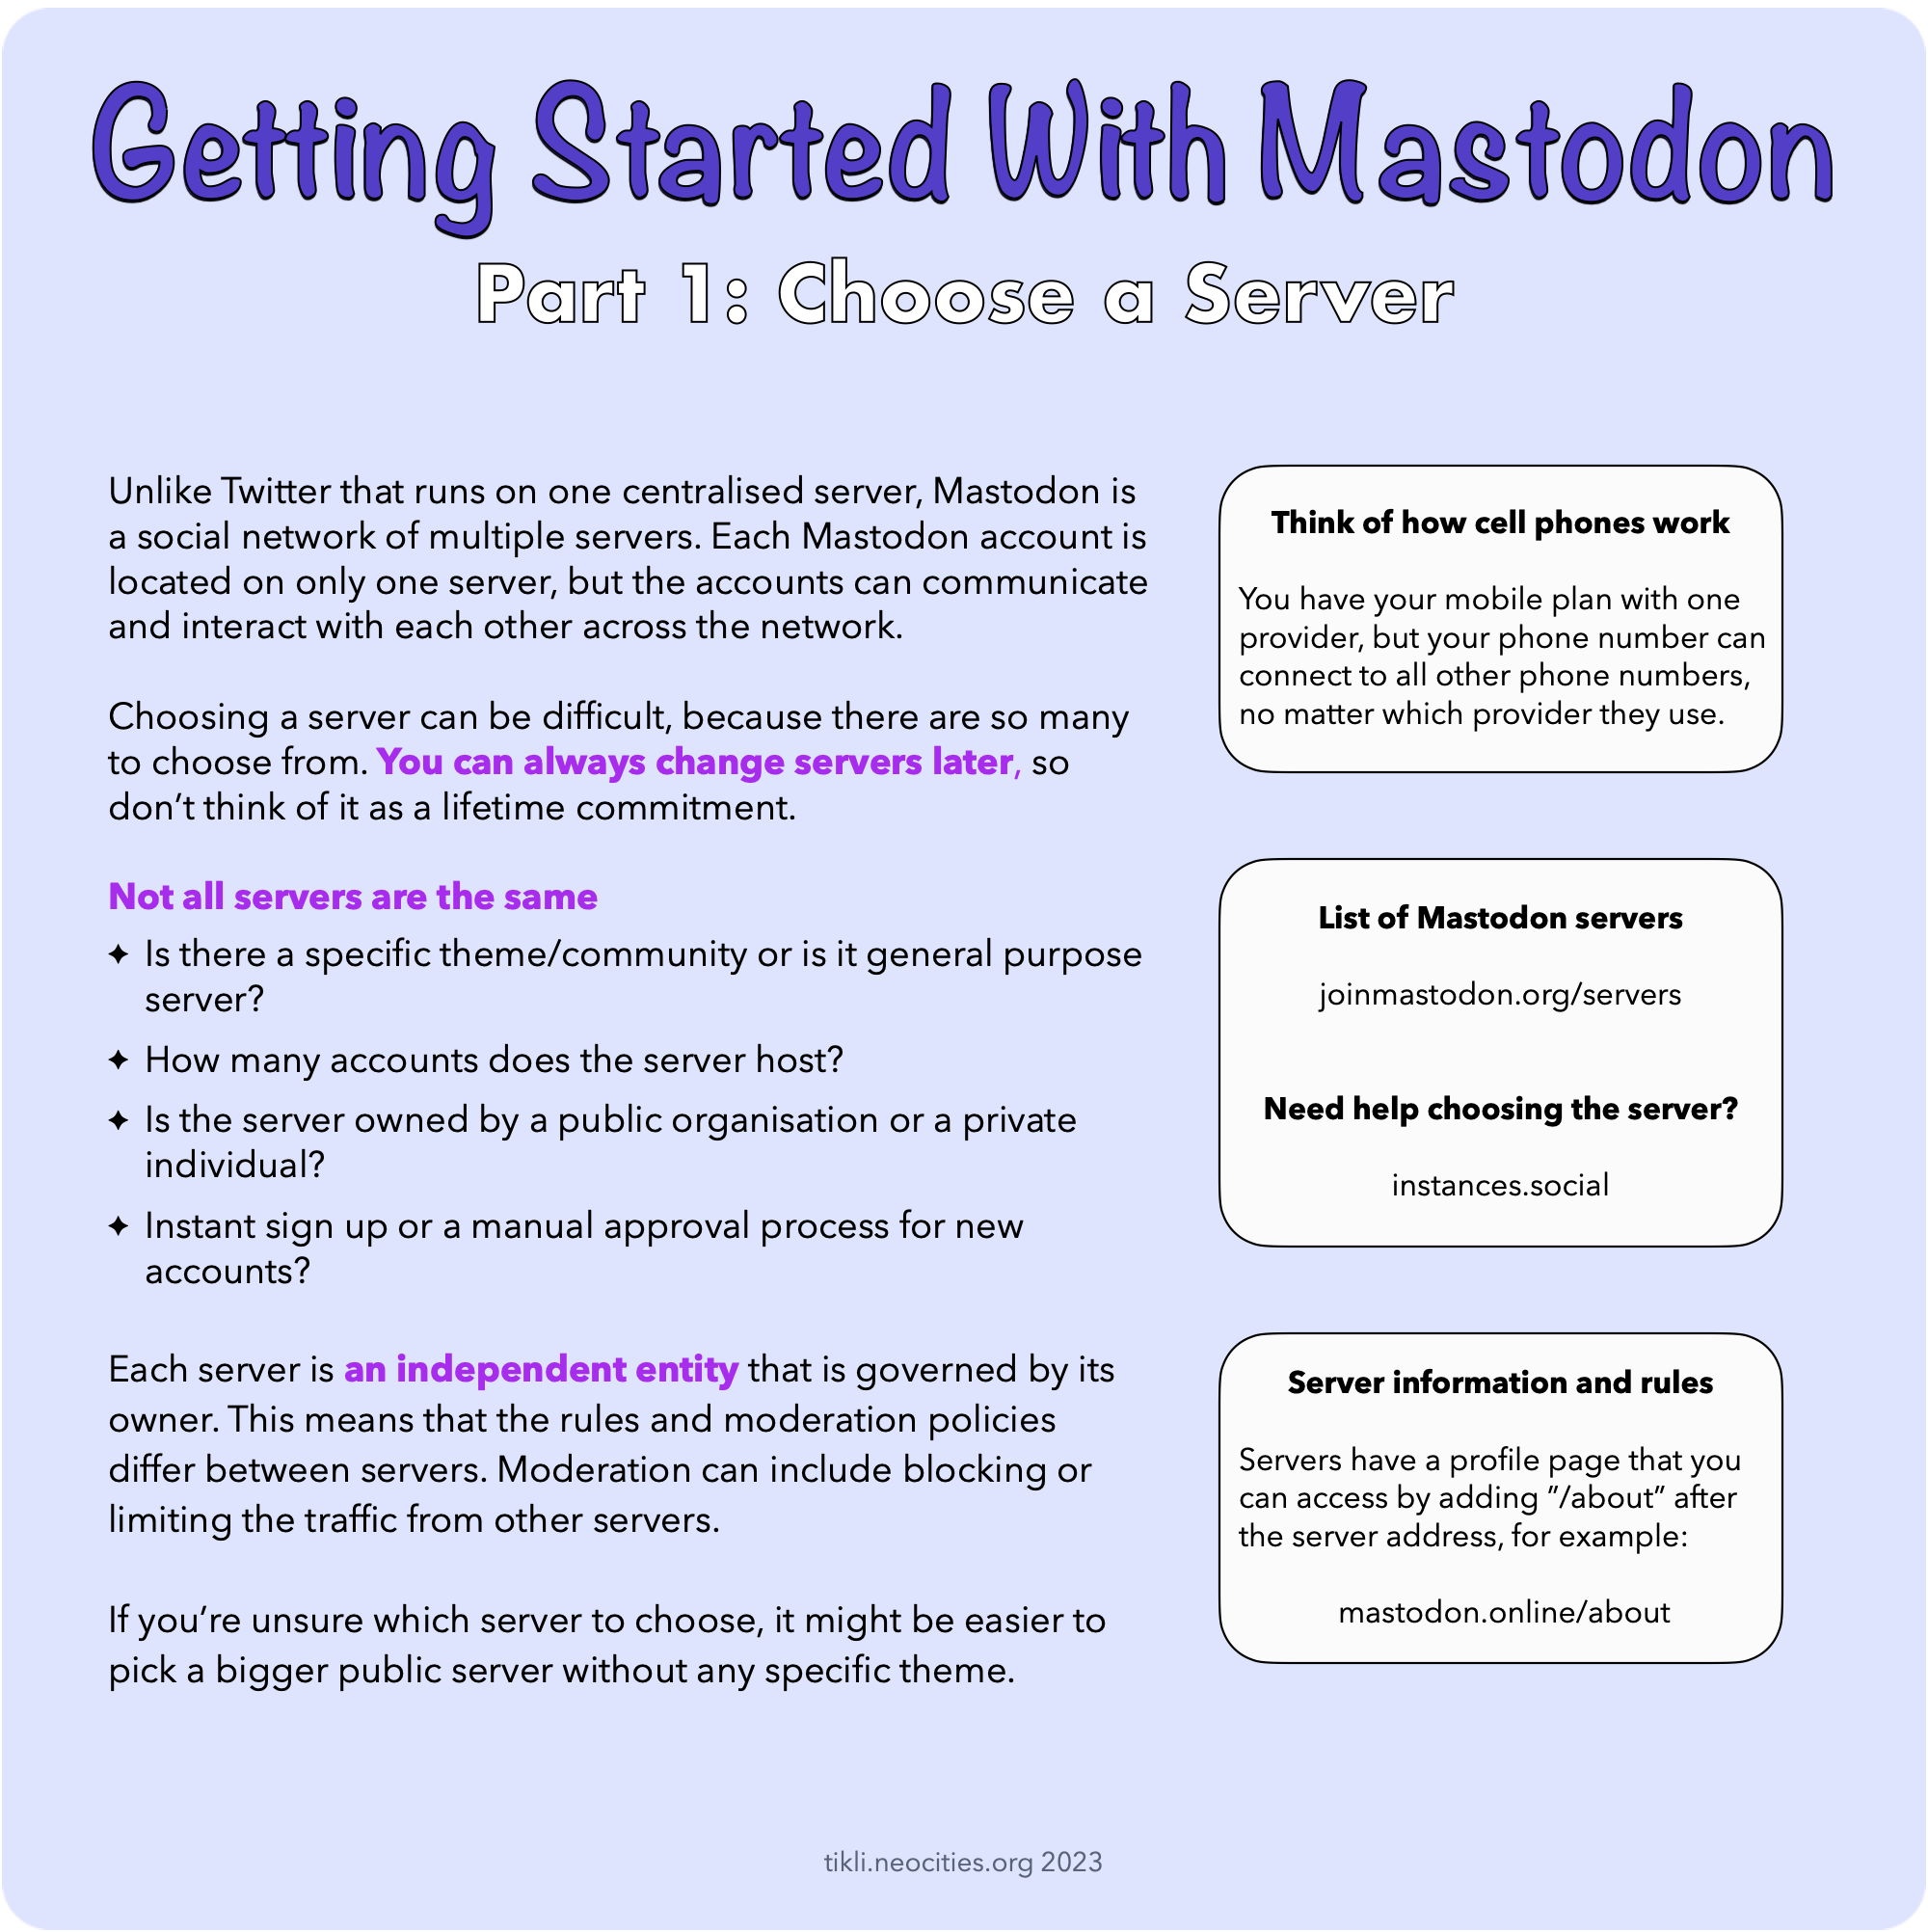
Unlike Twitter that runs on one centralised server, Mastodon is a social network of multiple servers. Each Mastodon account is located on only one server, but the accounts can communicate and interact with each other across the network.
Think of how cell phones work. You have your mobile plan with one provider, but your phone number can connect to all other phone numbers, no matter which provider they use.
Choosing a server can be difficult, because there are so many to choose from. You can always change servers later, so don’t think of it as a lifetime commitment.
Not all servers are the same
- Is there a specific theme/community or is it general purpose server?
- How many accounts does the server host?
- Is the server owned by a public organisation or a private individual?
- Instant sign up or a manual approval process for new accounts?
Each server is an independent entity that is governed by its owner. This means that the rules and moderation policies differ between servers. Moderation can include blocking or limiting the traffic from other servers.
If you’re unsure which server to choose, it might be easier to pick a bigger public server without any specific theme.
Server information and rules
Servers have a profile page that you can access by adding ”/about” after the server address, for example: mastodon.online/about
List of Mastodon servers
https://joinmastodon.org/servers
Need help choosing the server?
Part 2: Choose an App
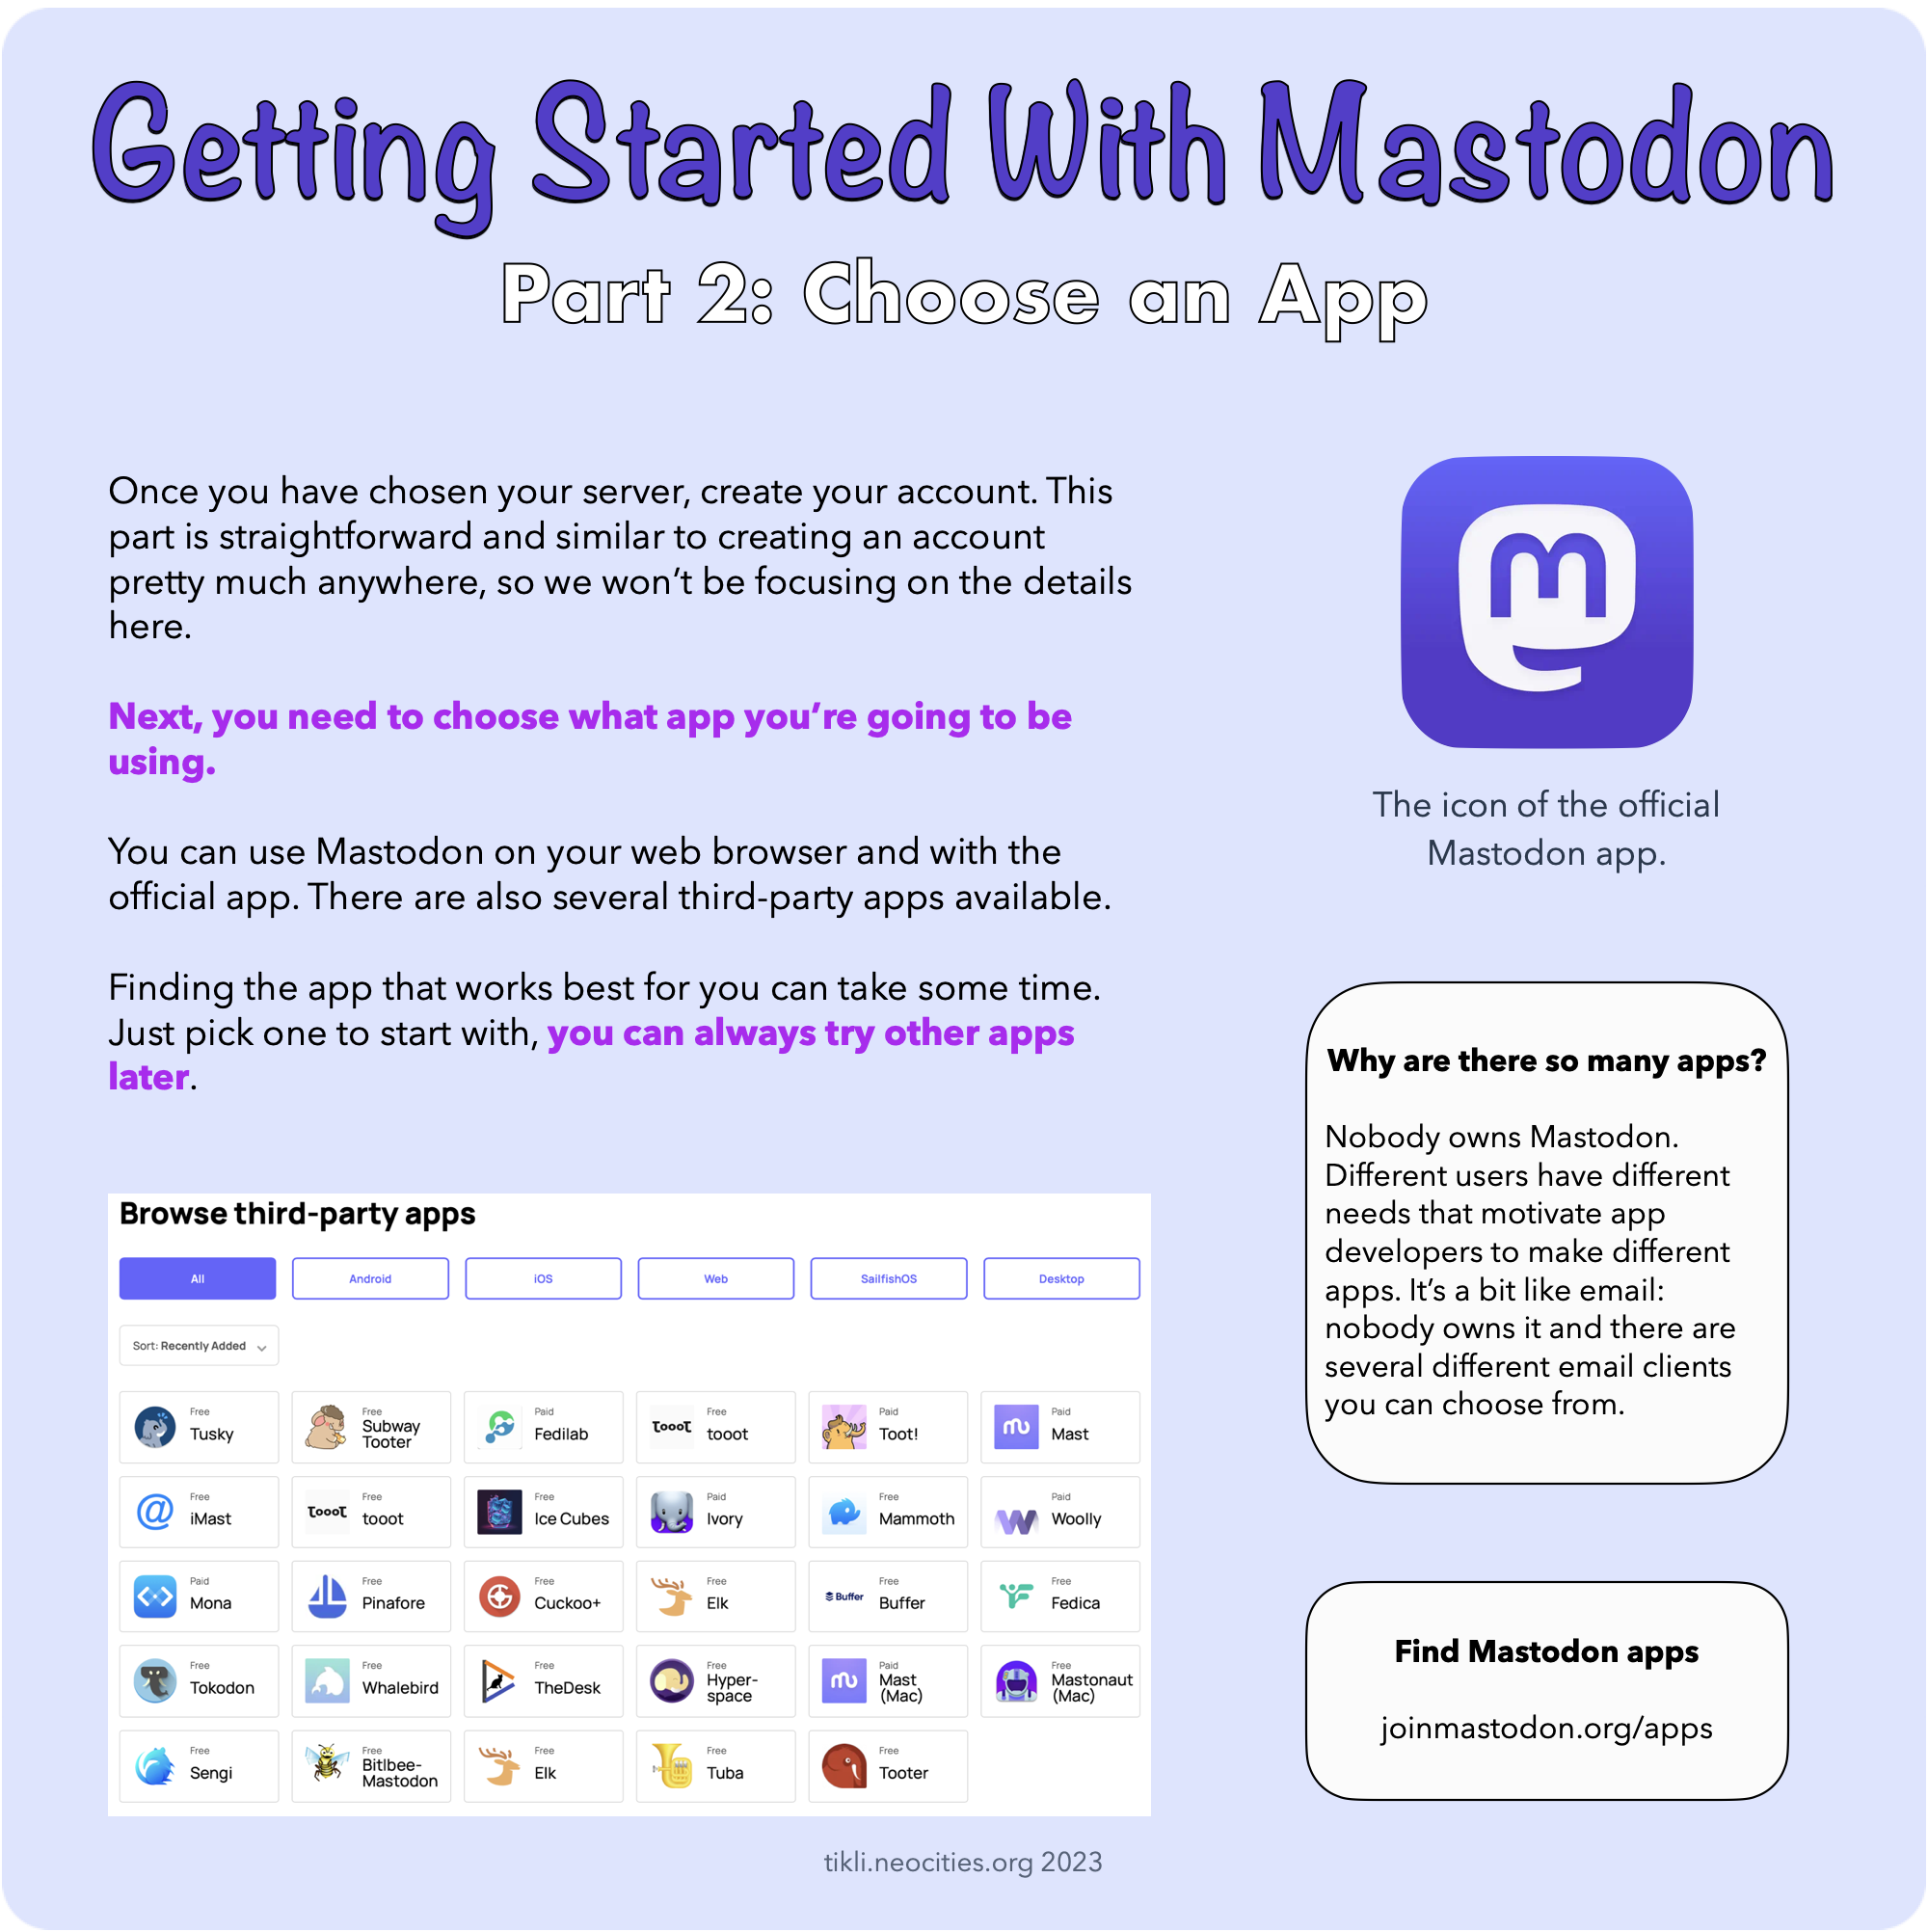
Once you have chosen your server, create your account. This part is straightforward and similar to creating an account pretty much anywhere, so we won’t be focusing on the details here.
Next, you need to choose what app you’re going to be using.
You can use Mastodon on your web browser and with the official app. There are also several third-party apps available.
Finding the app that works best for you can take some time. Just pick one to start with, you can always try other apps later.
Why are there so many apps?
Nobody owns Mastodon. Different users have different needs that motivate app developers to make different apps. It’s a bit like email: nobody owns it and there are several different email clients you can choose from.
Find Mastodon apps
Part 3: Set Up Your Profile
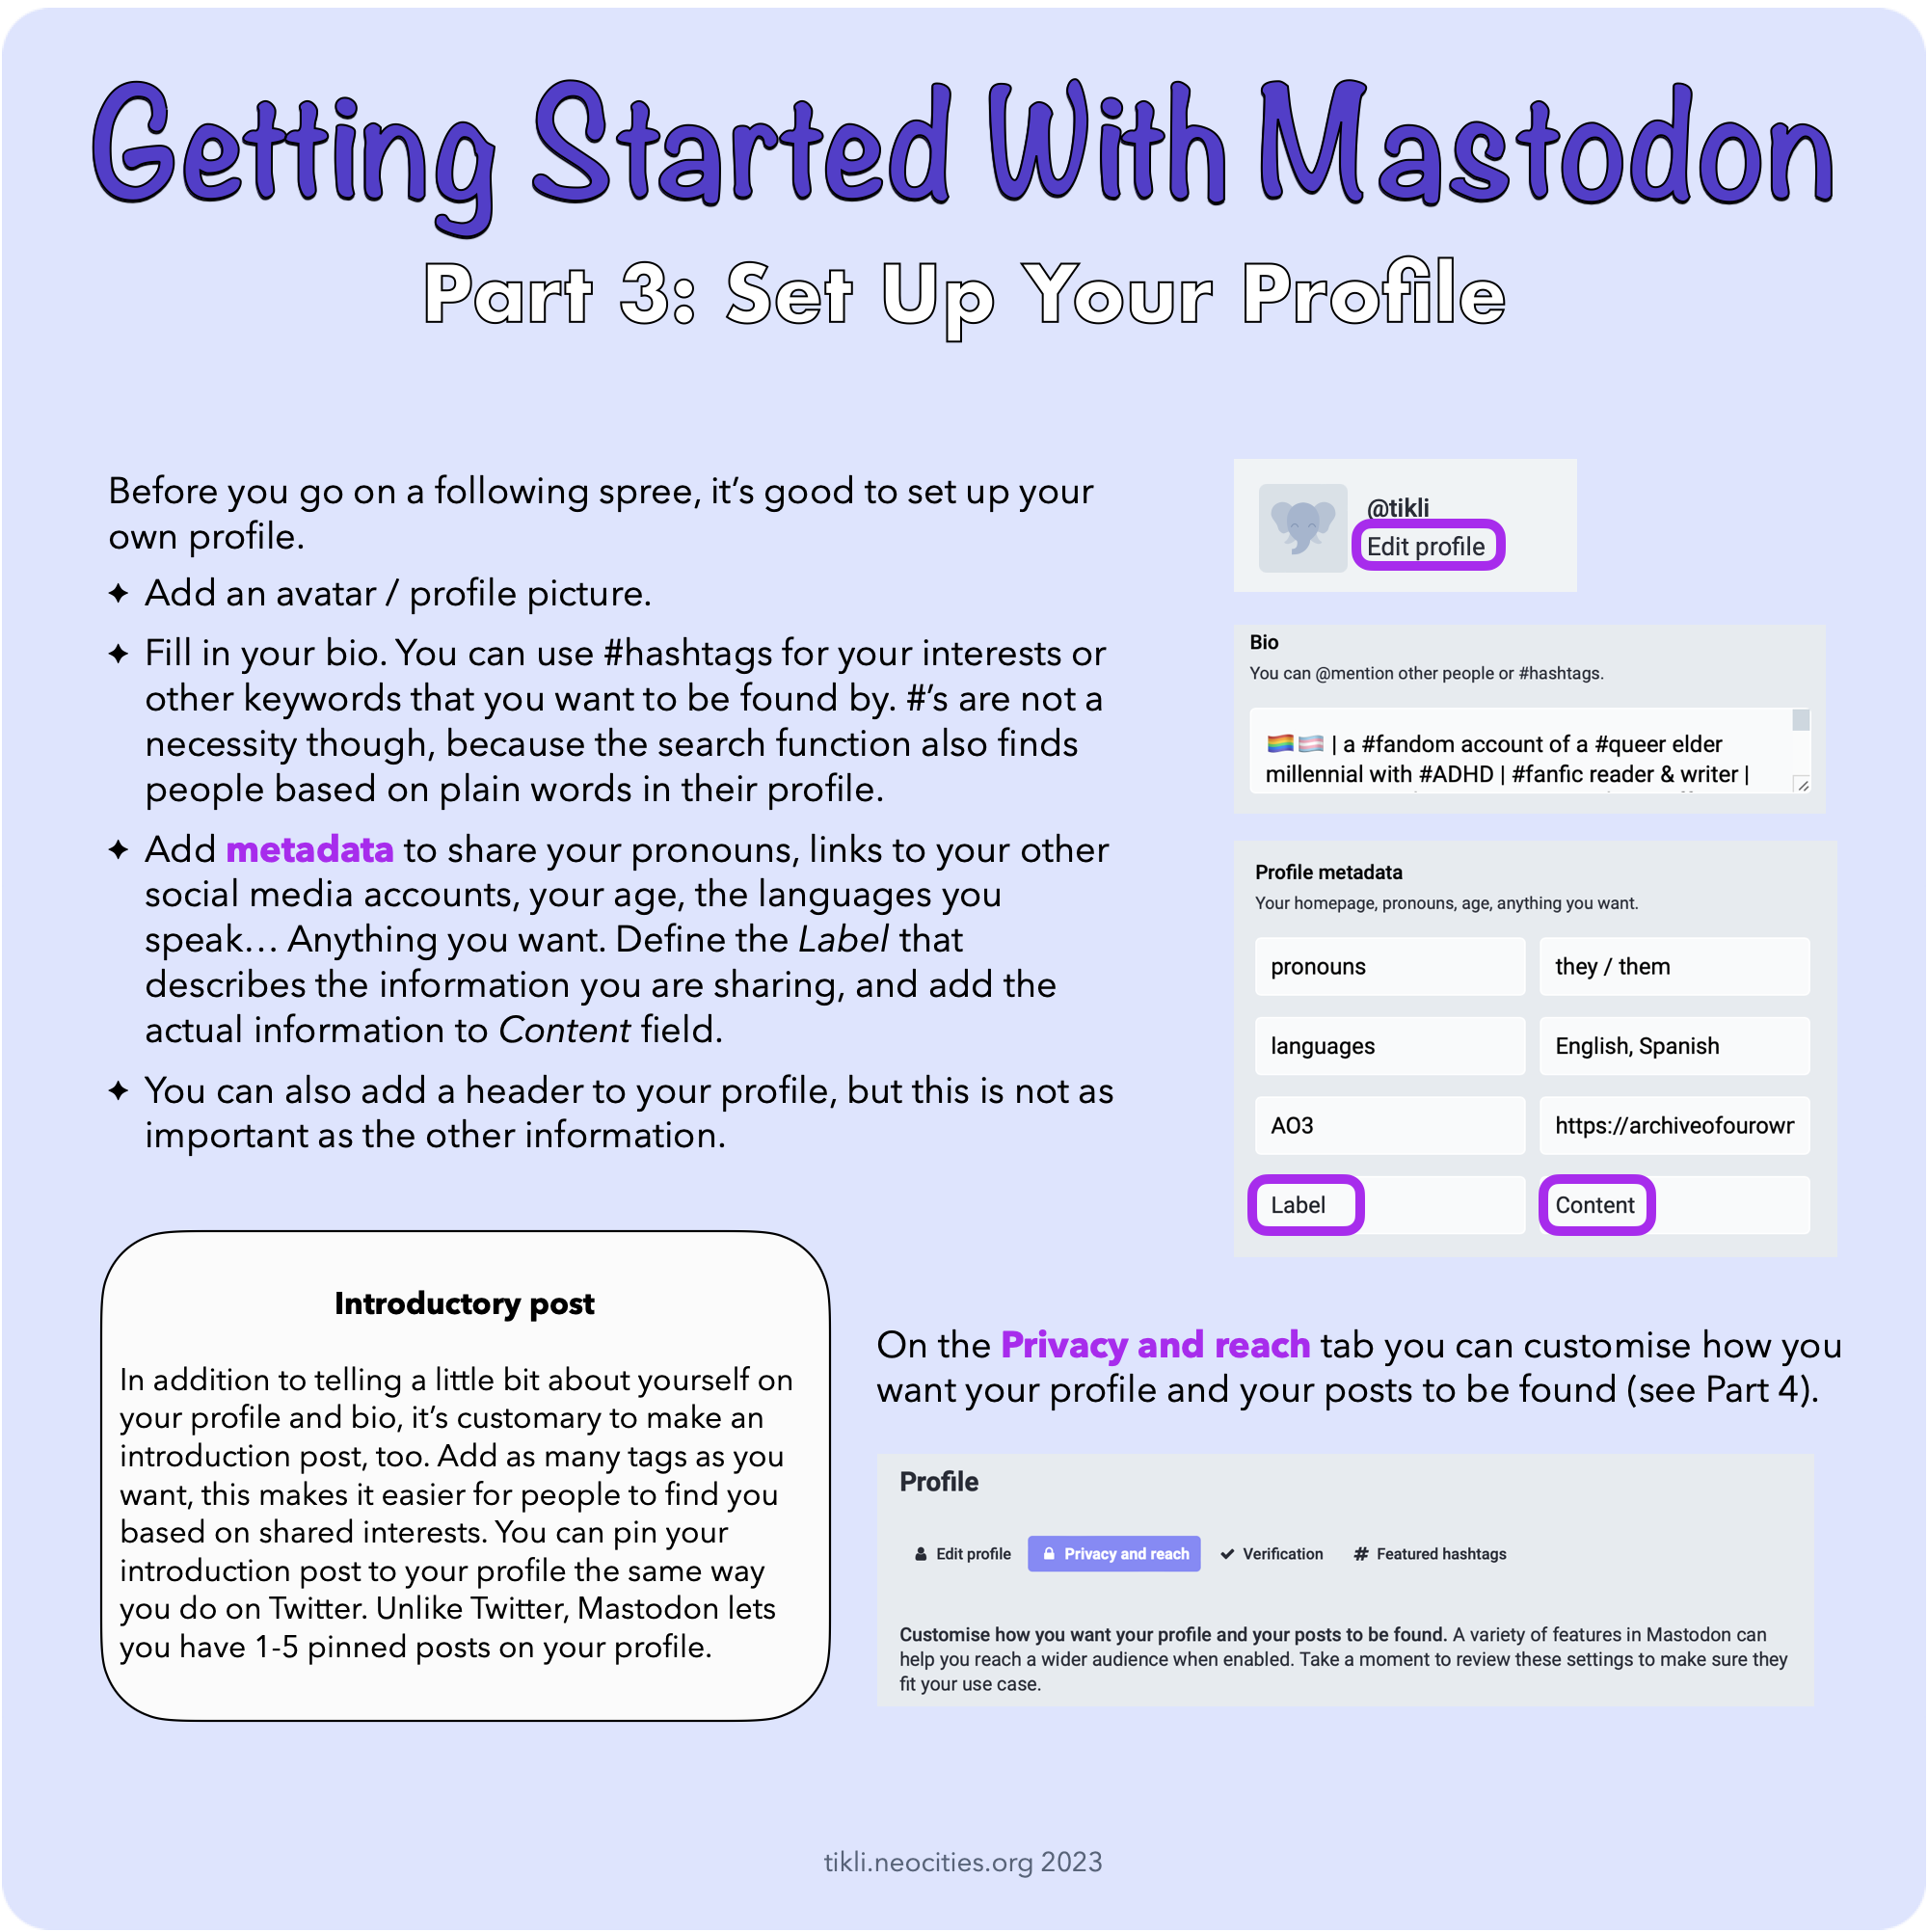
Before you go on a following spree, it’s good to set up your own profile.
- Add an avatar / profile picture.
- Fill in your bio. You can use #hashtags for your interests or other keywords that you want to be found by. #'s are not a necessity though, because the search function also finds people based on plain words in their profile.
- Add metadata to share your pronouns, links to your other social media accounts, your age, the languages you speak… Anything you want. Define the Label that describes the information you are sharing, and add the actual information to Content field.
- You can also add a header to your profile, but this is not as important as the other information.
On the Privacy and reach tab you can customise how you want your profile and your posts to be found. A variety of features in Mastodon can help you reach a wider audience when enabled (see part 4).
Introductory post
In addition to telling a little bit about yourself on your profile and bio, it’s customary to make an introduction post, too. Add as many tags as you want, this makes it easier for people to find you based on shared interests. You can pin your introduction post to your profile the same way you do on Twitter. Unlike Twitter, Mastodon lets you have 1-5 pinned posts on your profile.
Part 4: Privacy and Reach
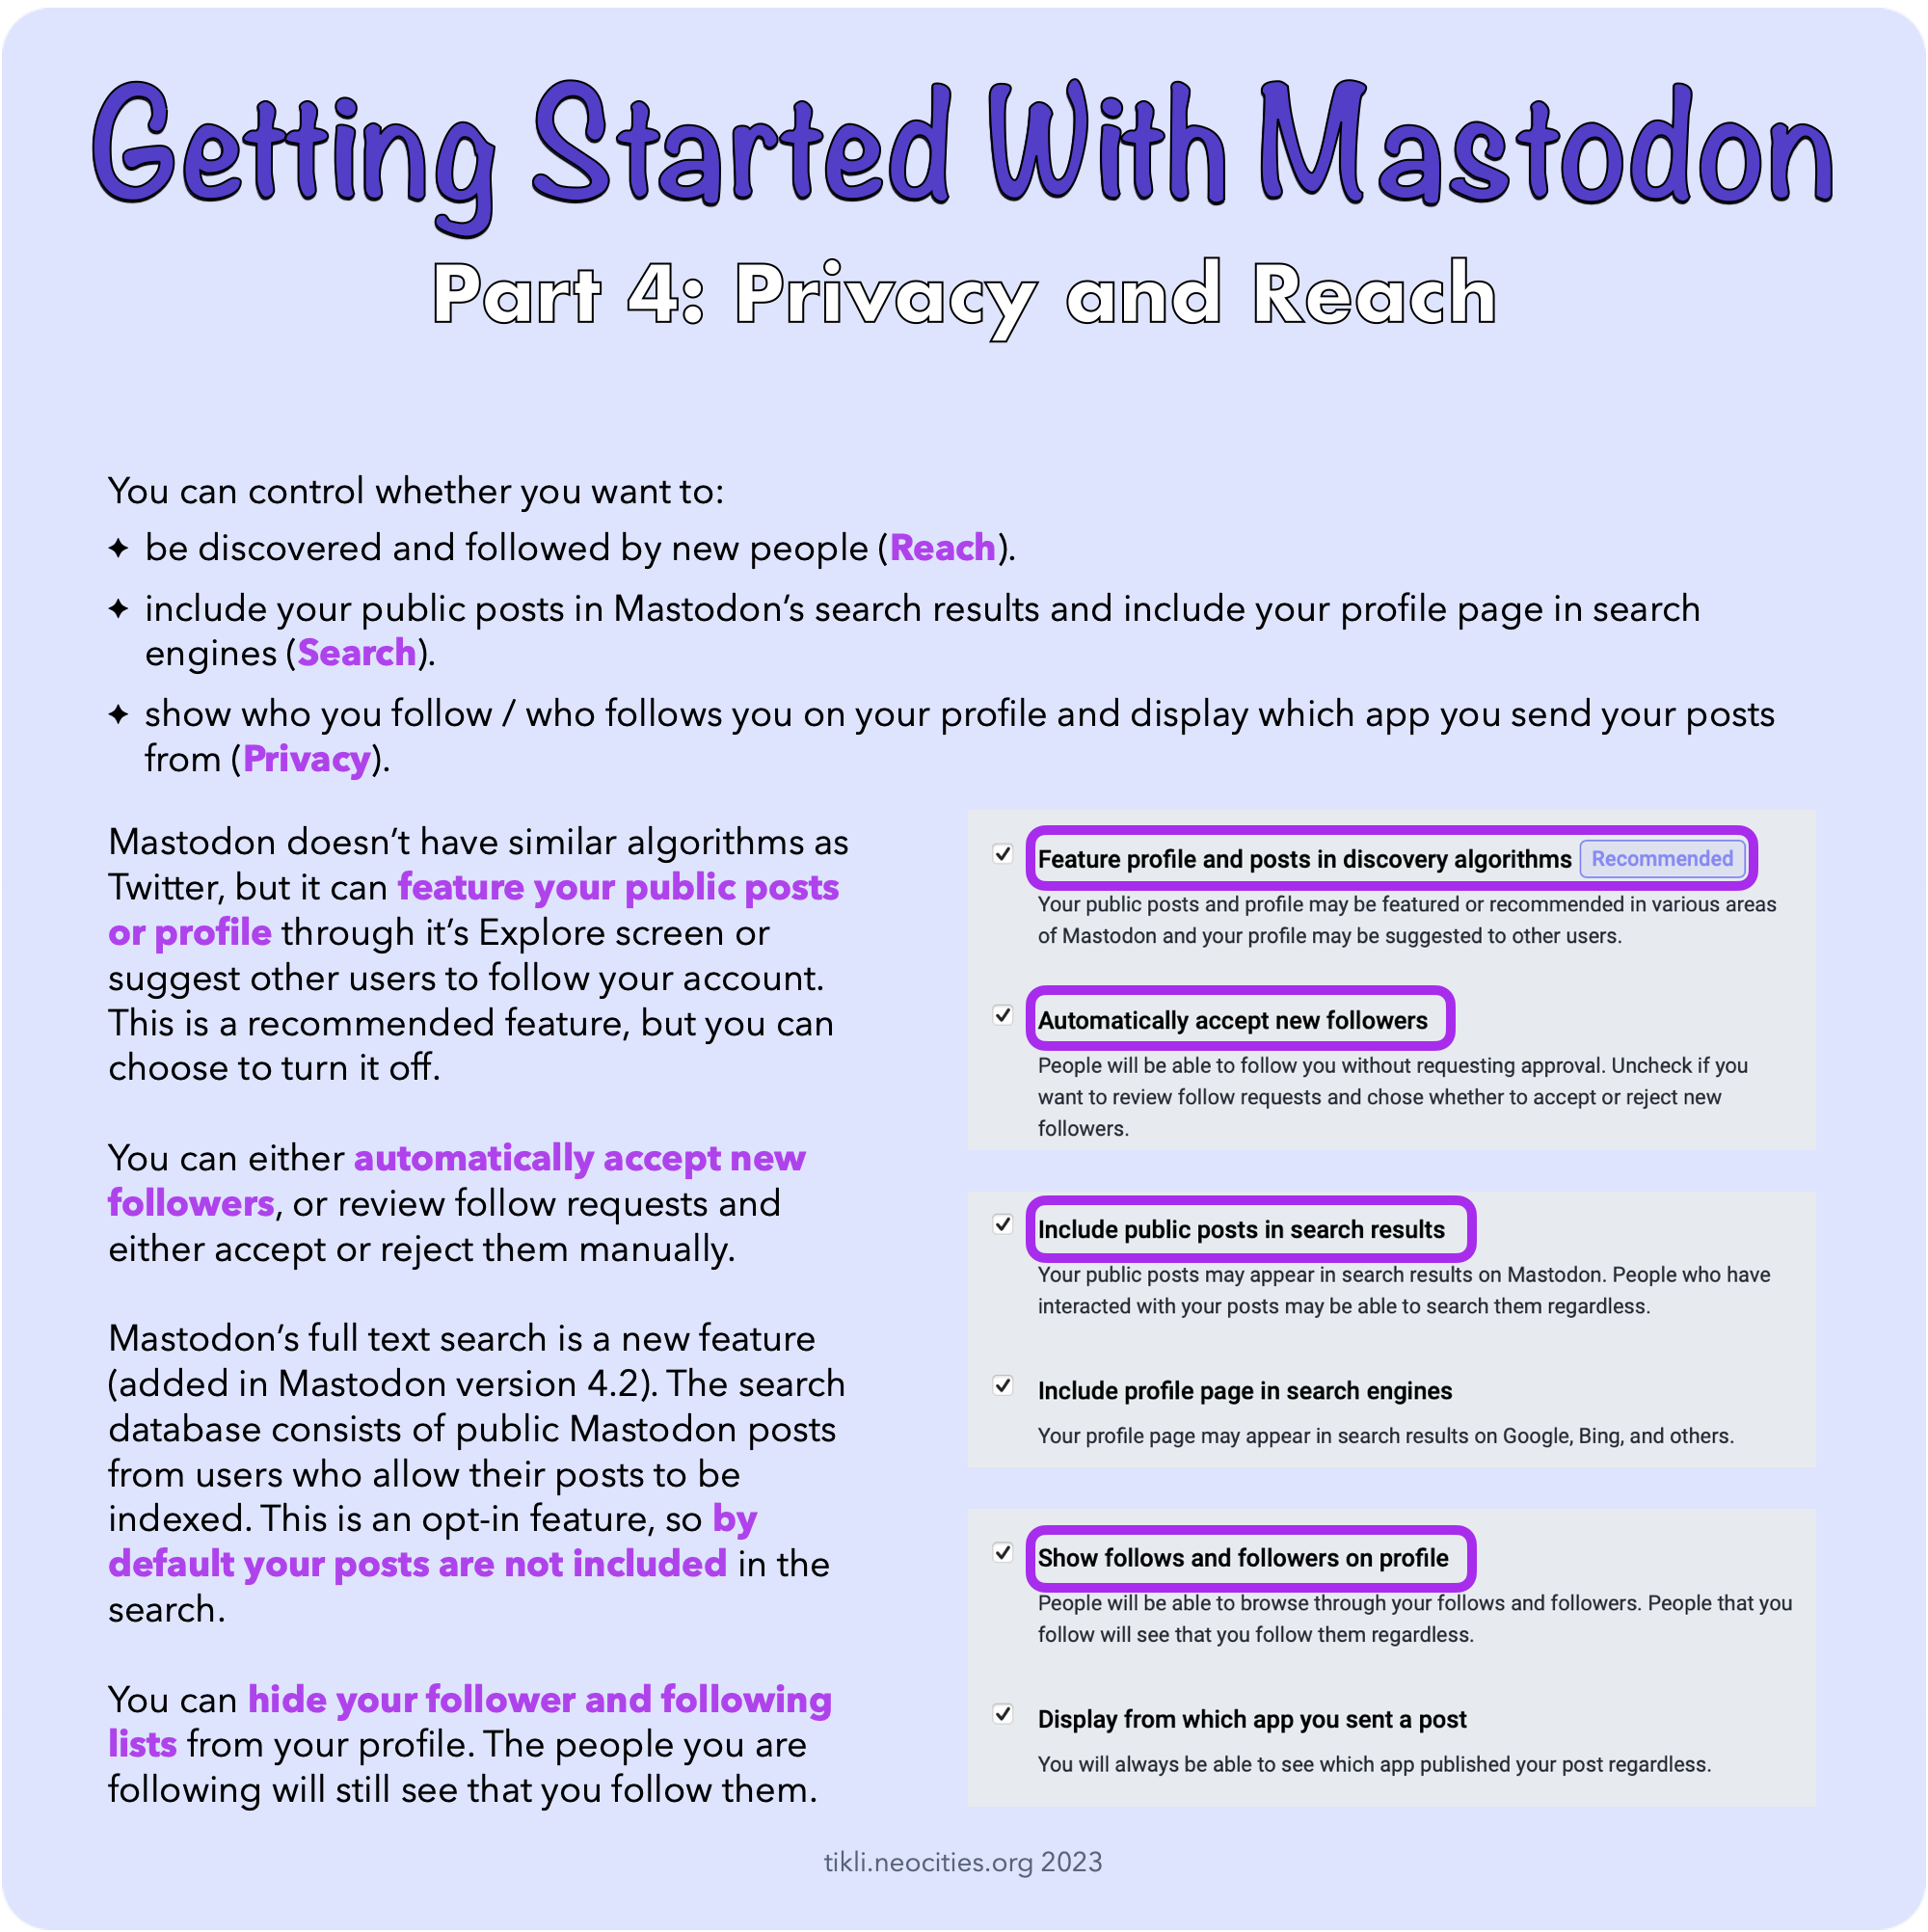
You can control whether you want to:
- be discovered and followed by new people (Reach)
- include your public posts in Mastodon’s search results and include your profile page in search engines (Search).
- show who you follow / who follows you on your profile and display which app you send your posts from (Privacy).
Mastodon doesn’t have similar algorithms as Twitter, but it can feature your public posts or profile through it’s Explore screen or suggest other users to follow your account. This is a recommended feature, but you can choose to turn it off.
You can either automatically accept new followers, or review follow requests and either accept or reject them manually.
Mastodon’s full text search is a new feature (added in Mastodon version 4.2). The search database consists of public Mastodon posts from users who allow their posts to be indexed. This is an opt-in feature, so by default your posts are not included in the search.
You can hide your follower and following lists from your profile. The people you are following will still see that you follow them.
Part 5: Find Other Users
Use Search to find profiles, hashtags and public posts.
If you don’t add any search options or use any quick actions, the search results consist of user profiles that contain the word(s) you searched with, hashtags that start with the word you searched with and posts that include the word(s) you searched with.
You can also search with a server name to find profiles from a specific server.
Because there are several Mastodon servers, the full username always includes the name of the server, too: @username@server.name
The same short username can be used on several servers, so make sure you don’t mix people up when looking for a specific person! The server name is a bit like a surname to your username.
Where are my friends?
Ask your friends for their full usernames / direct links to their profiles to find them more easily!

Part 6: Curate Your Feed
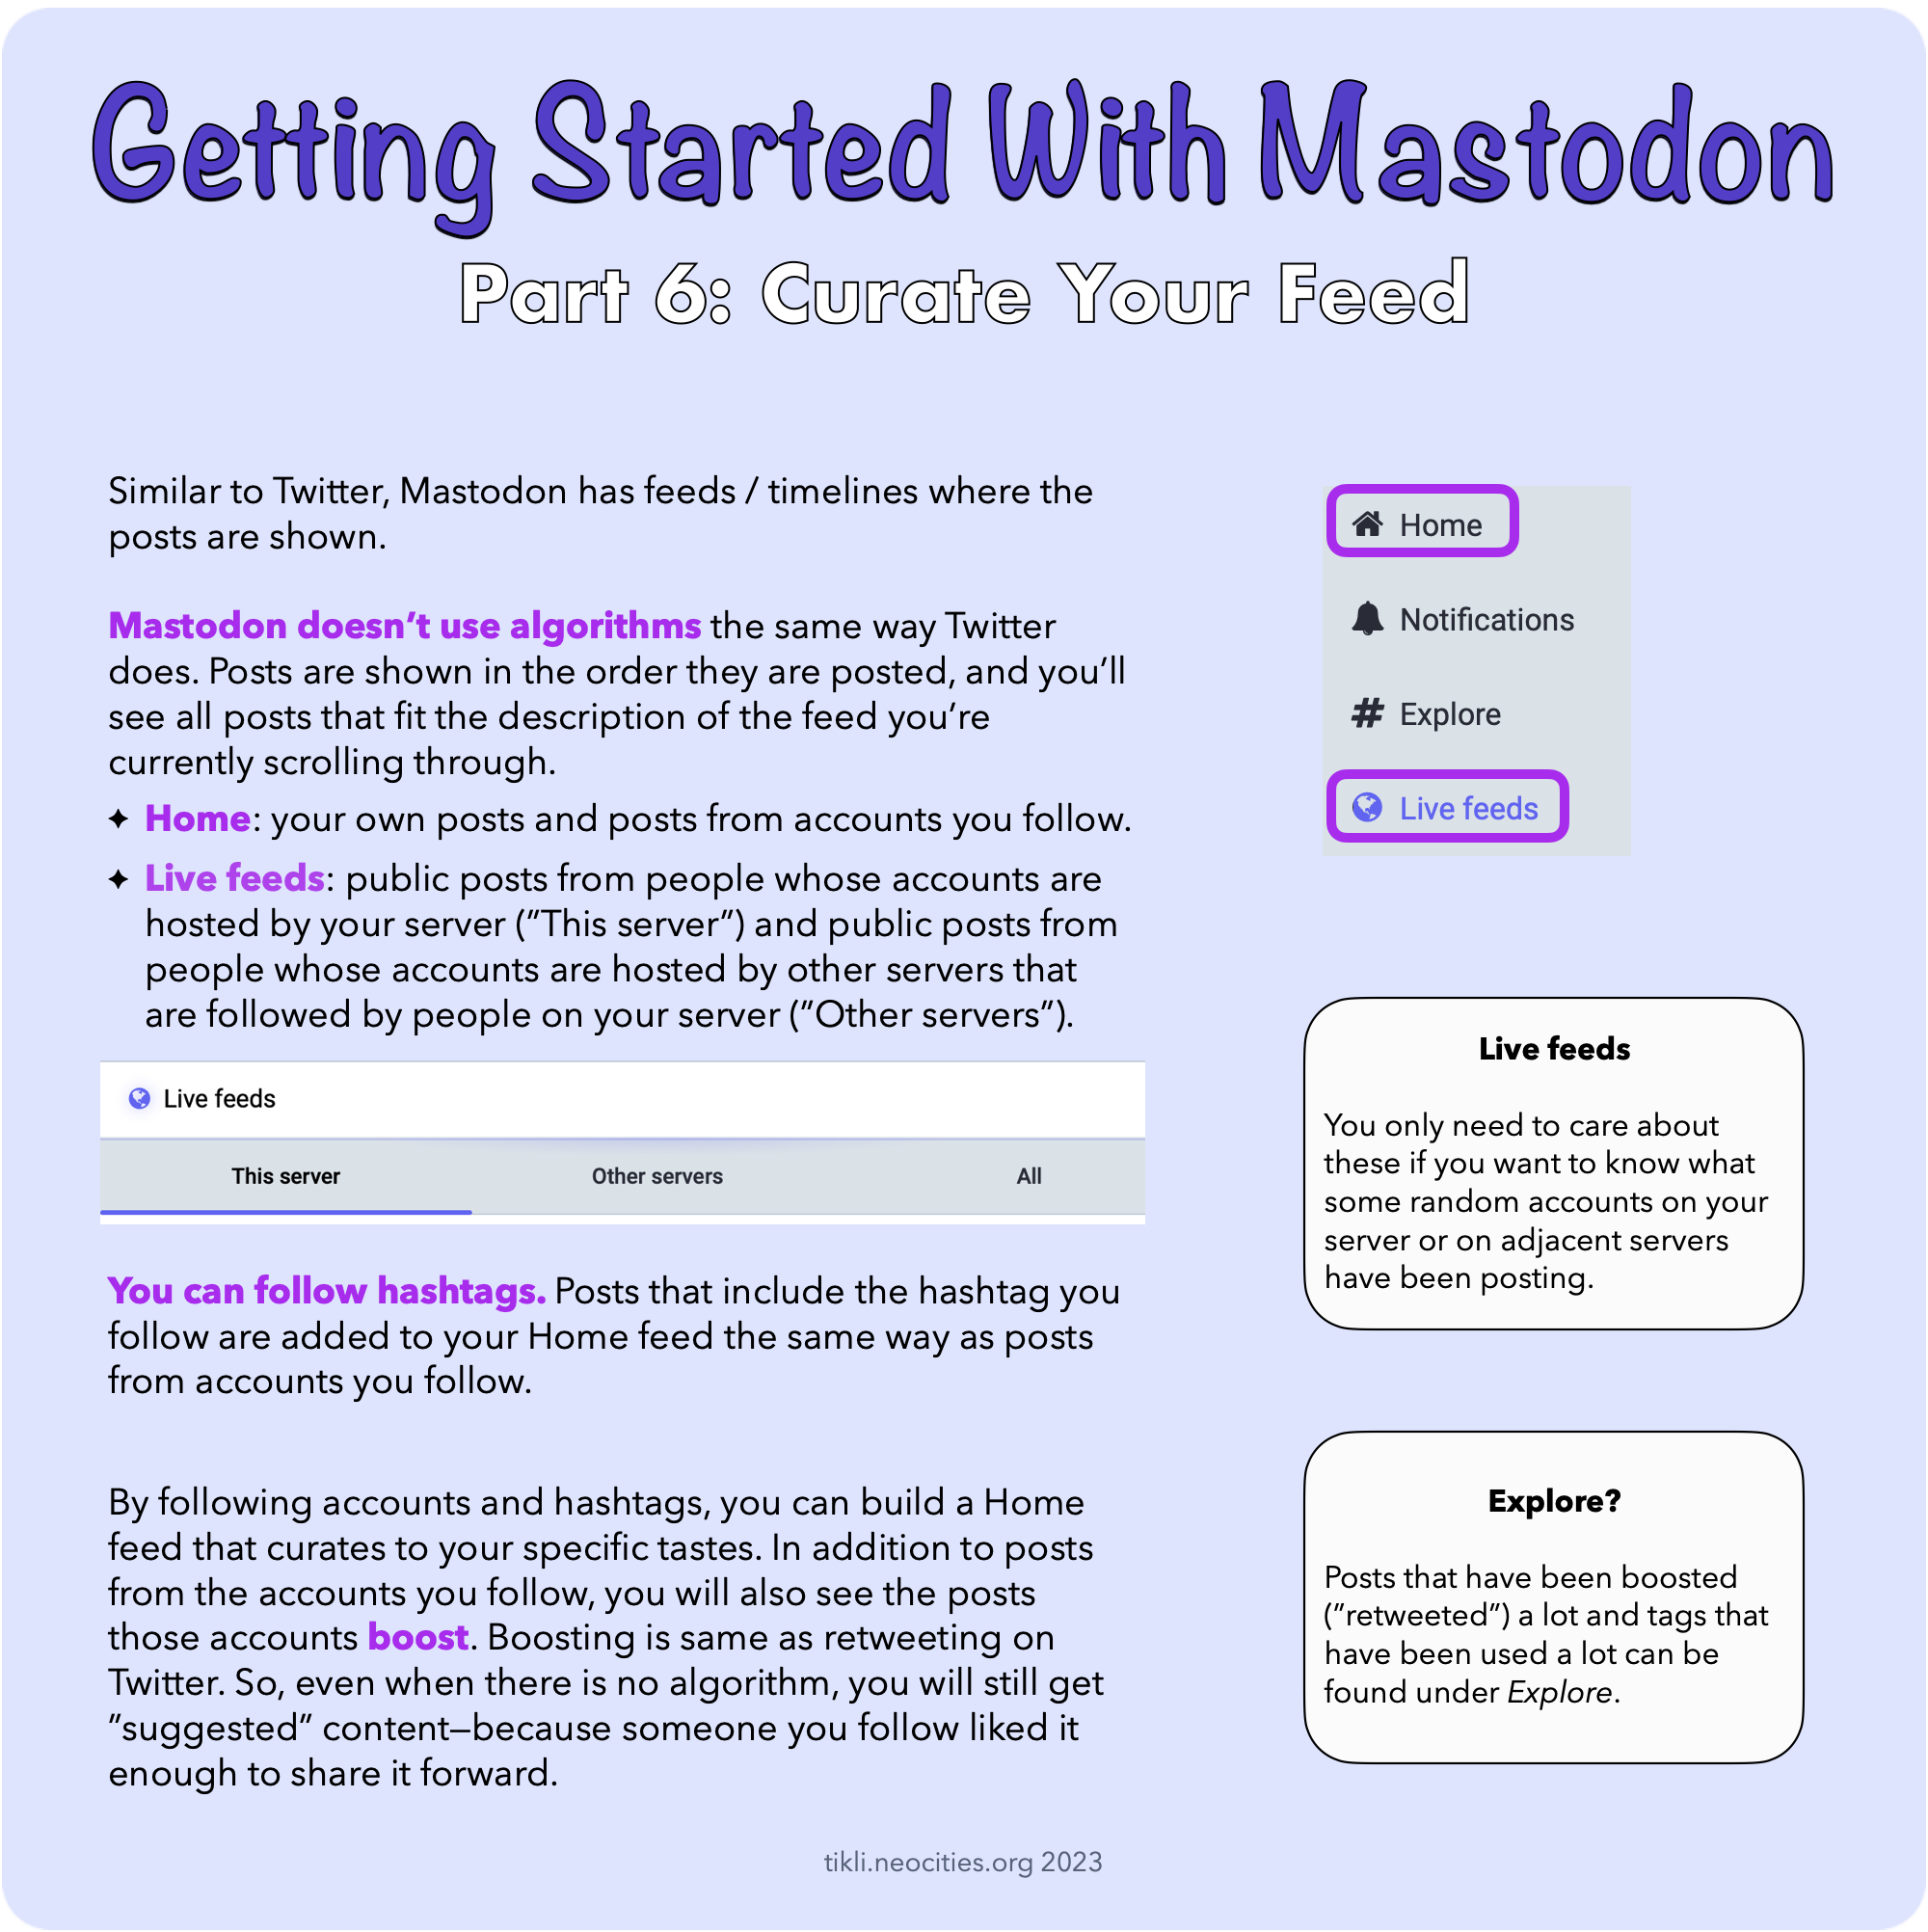
Similar to Twitter, Mastodon has feeds / timelines where the posts are shown.
Mastodon doesn’t use algorithms the same way Twitter does. Posts are shown in the order they are posted, and you’ll see all posts that fit the description of the feed you’re currently scrolling through.
- Home: your own posts and posts from accounts you follow.
- Live feeds: public posts from people whose accounts are hosted by your server (”This server”) and public posts from people whose accounts are hosted by other servers that are followed by people on your server (”Other servers”).
Live feeds
You only need to care about these if you want to know what some random accounts on your server or on adjacent servers have been posting.
Explore?
Posts that have been boosted (”retweeted”) a lot and tags that have been used a lot can be found under Explore.
Hashtags
You can follow hashtags. Posts that include the hashtag you follow are added to your Home feed the same way as posts from accounts you follow.
By following accounts and hashtags, you can build a Home feed that curates to your specific tastes. In addition to posts from the accounts you follow, you will also see the posts those accounts boost. Boosting is same as retweeting on Twitter. So, even when there is no algorithm, you will still get ”suggested” content&emdash;because someone you follow liked it enough to share it forward.
Part 7: How to Post
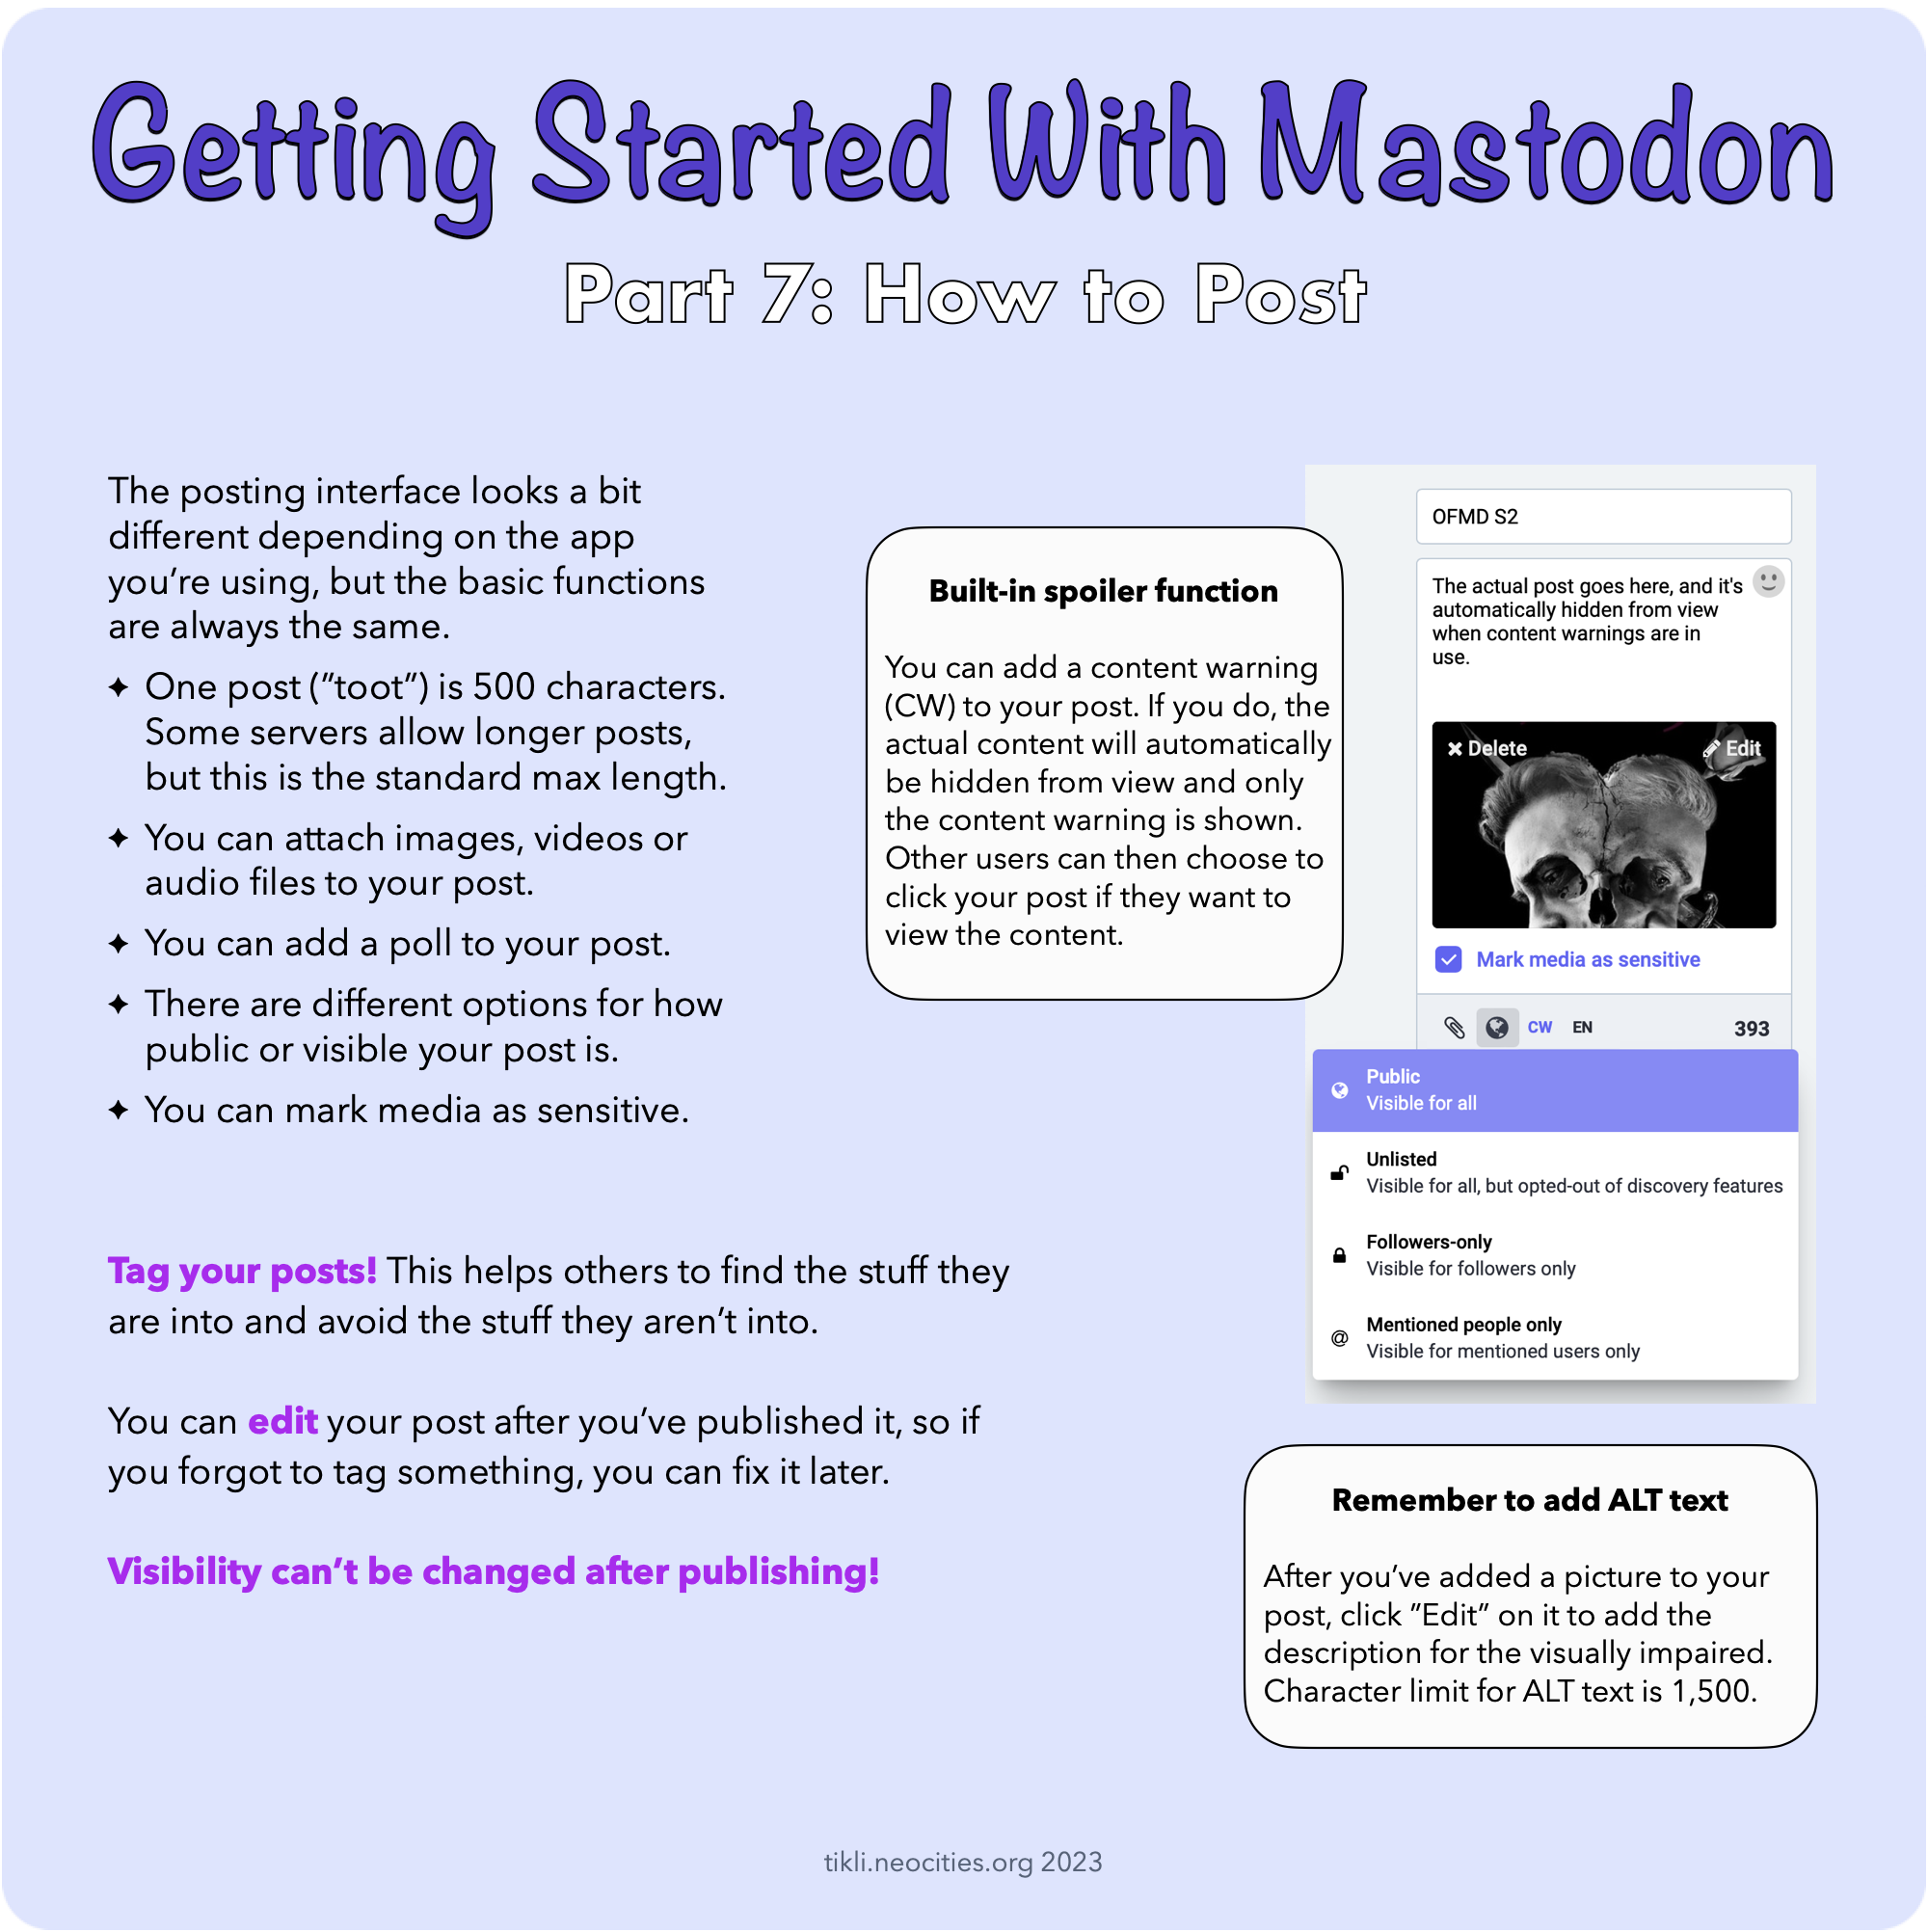
The posting interface looks a bit different depending on the app you’re using, but the basic functions are always the same.
- One post (”toot”) is 500 characters. Some servers allow longer posts, but this is the standard max length.
- You can attach images, videos or audio files to your post.
- You can add a poll to your post.
- There are different options for how public or visible your post is.
- You can mark media as sensitive.
Built-in spoiler function
You can add a content warning (CW) to your post. If you do, the actual content will automatically be hidden from view and only the content warning is shown. Other users can then choose to click your post if they want to view the content.
Remember to add ALT text
After you’ve added a picture to your post, click ”Edit” on it to add the description for the visually impaired. Character limit for ALT text is 1,500.
Tagging
Tag your posts! This helps others to find the stuff they are into and avoid the stuff they aren’t into.
Editing
You can edit your post after you’ve published it, so if you forgot to tag something, you can fix it later.
Visibility can’t be changed after publishing!
Part 8: Post Visibility & DMs
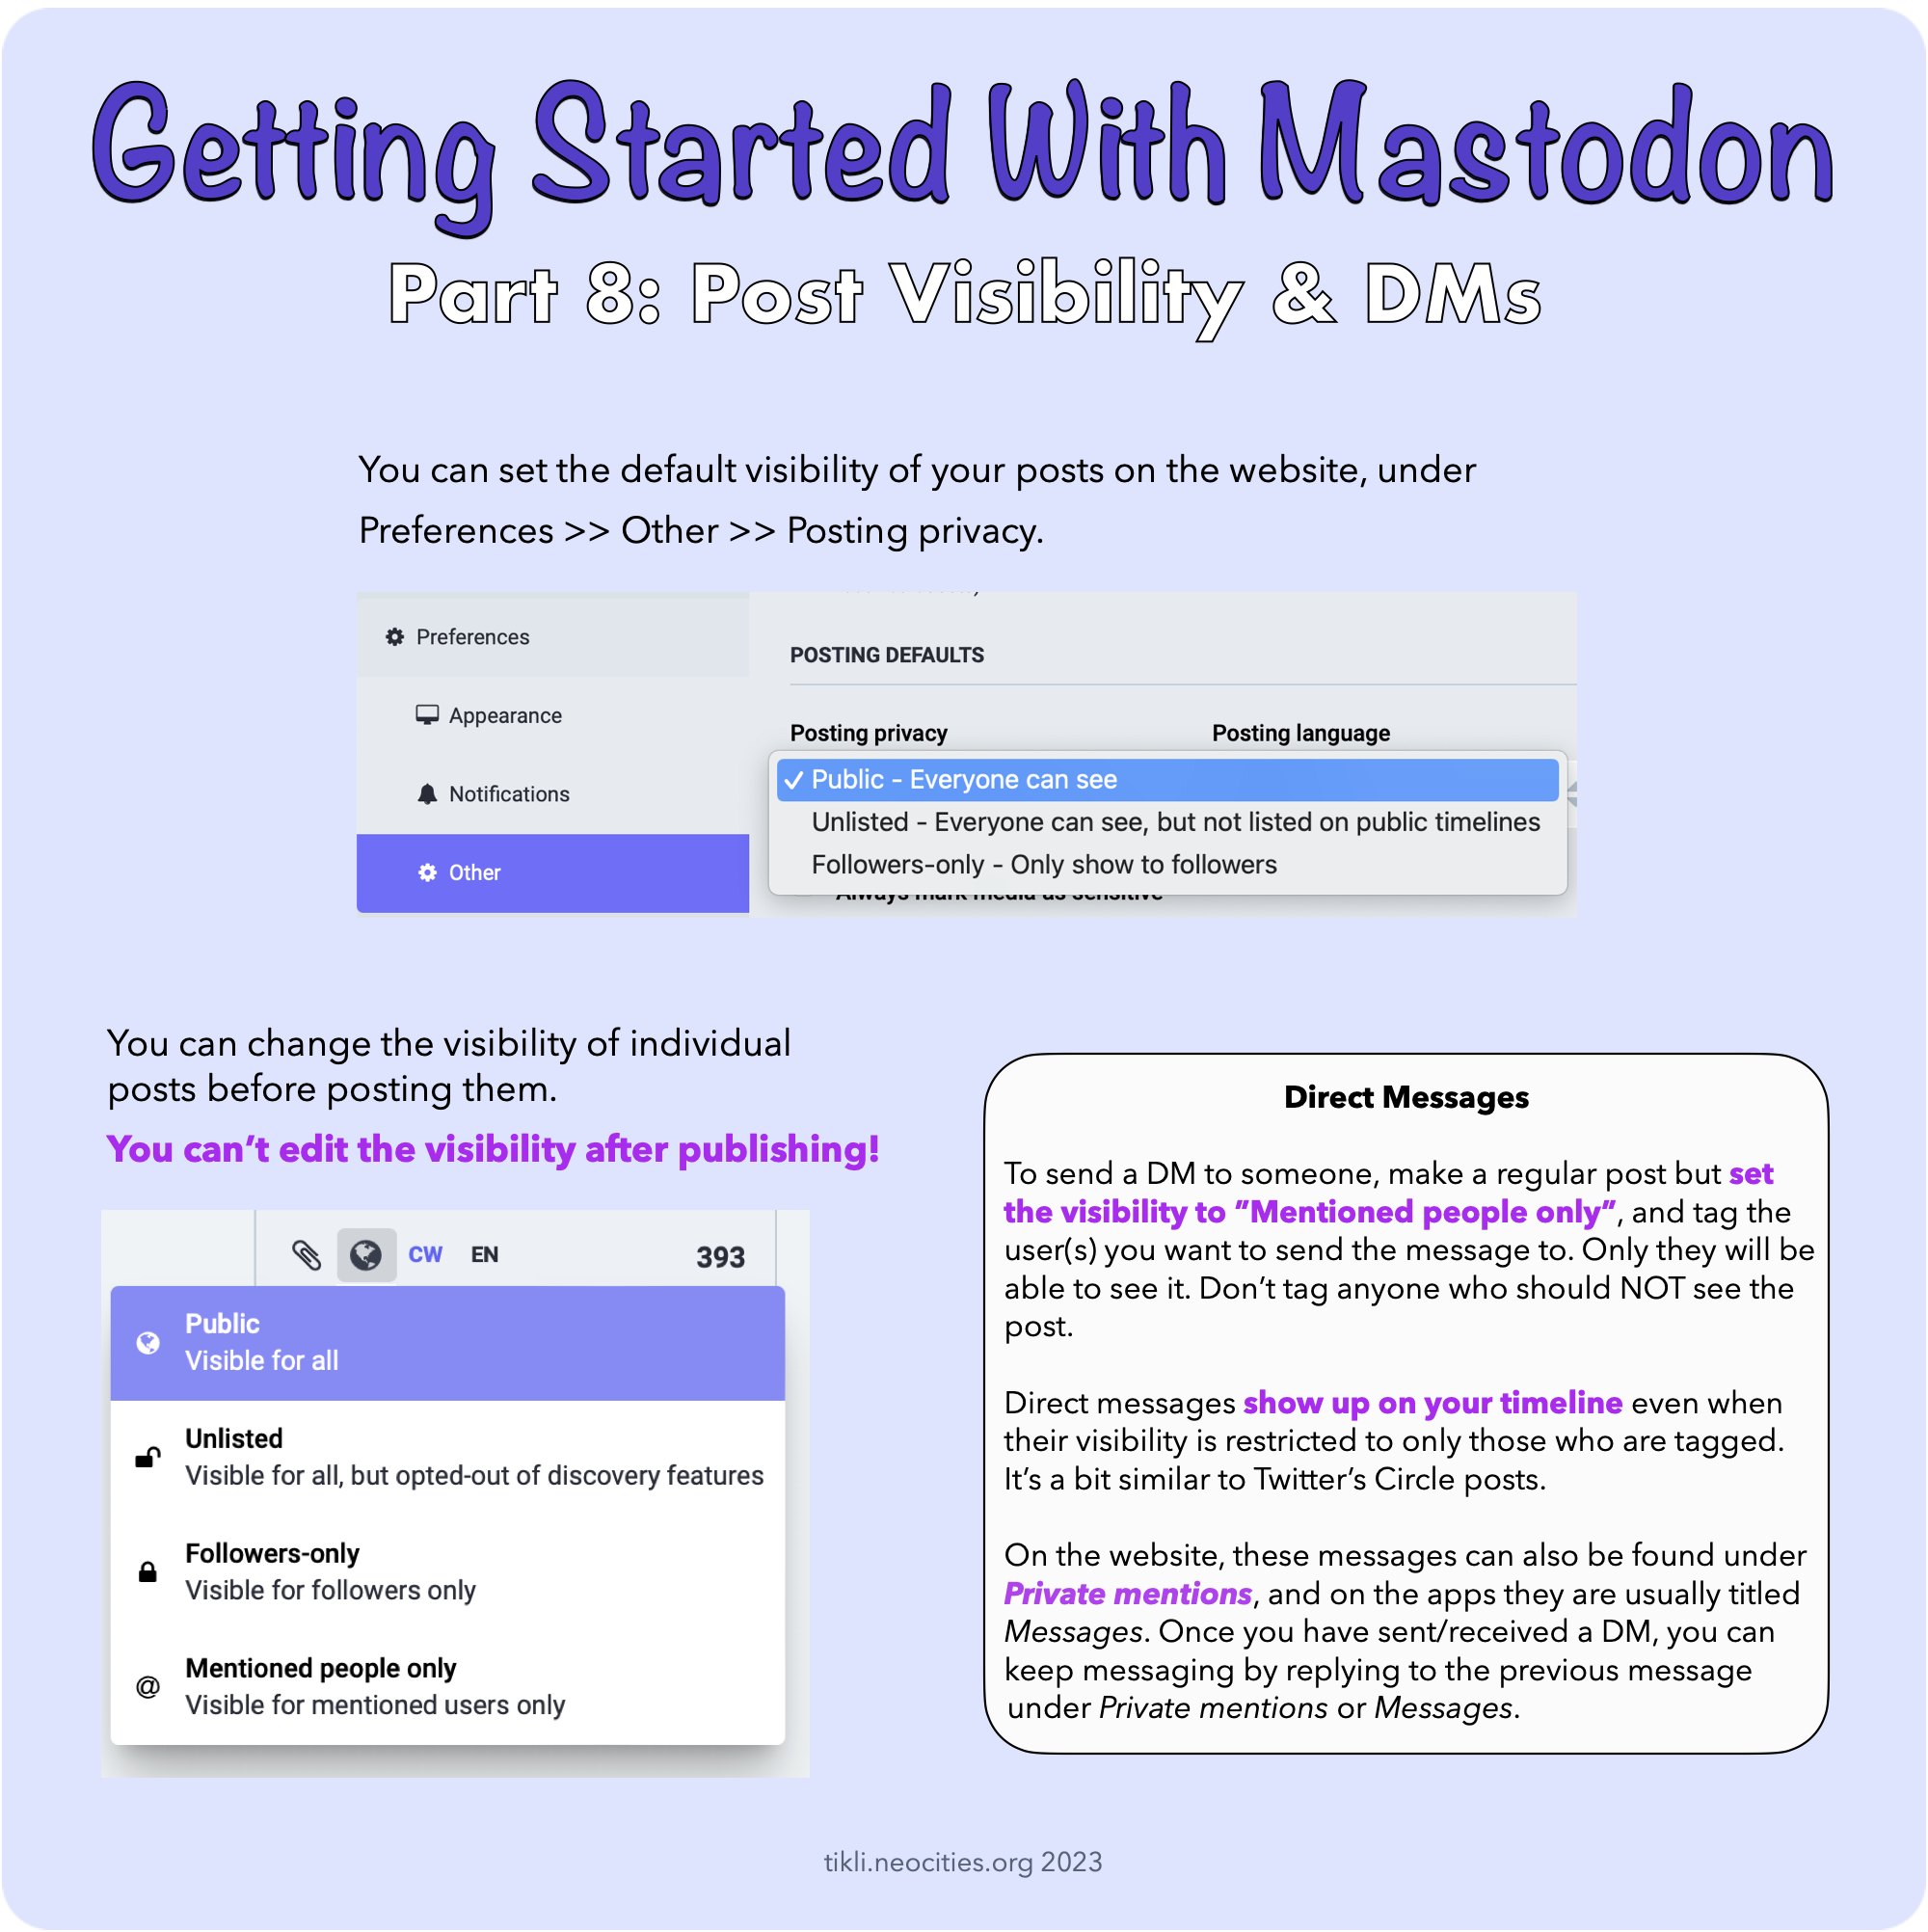
You can set the default visibility of your posts on the website, under Preferences > Other > Posting privacy.
- Public: Everyone can see the posts.
- Unlisted: Everyone can see the posts, but they are not listed on public timelines and aren’t searchable even by hashtags.
- Followers-only: Only people who follow your account can see the posts.
You can change the visibility of individual posts before posting them. You can’t edit the visibility after publishing!
Direct Messages
To send a DM to someone, make a regular post but set the visibility to ”Mentioned people only”, and tag the user(s) you want to send the message to. Only they will be able to see it. Don’t tag anyone who should NOT see the post.
Direct messages show up on your timeline even when their visibility is restricted to only those who are tagged. It’s a bit similar to Twitter’s Circle posts.
On the website, these messages can also be found under Private mentions, and on the apps they are usually titled Messages. Once you have sent/received a DM, you can keep messaging by replying to the previous message under Private mentions or Messages.
Read more about the post visibility and direct messages from Fedi.Tips!
Are you worried about the privacy of your DMs, because you've heard that your server admins can read them? This blog post by Oliphant explains what's the deal with DMs and Mastodon: Reading your DMs
Part 9: Boost & Favourite
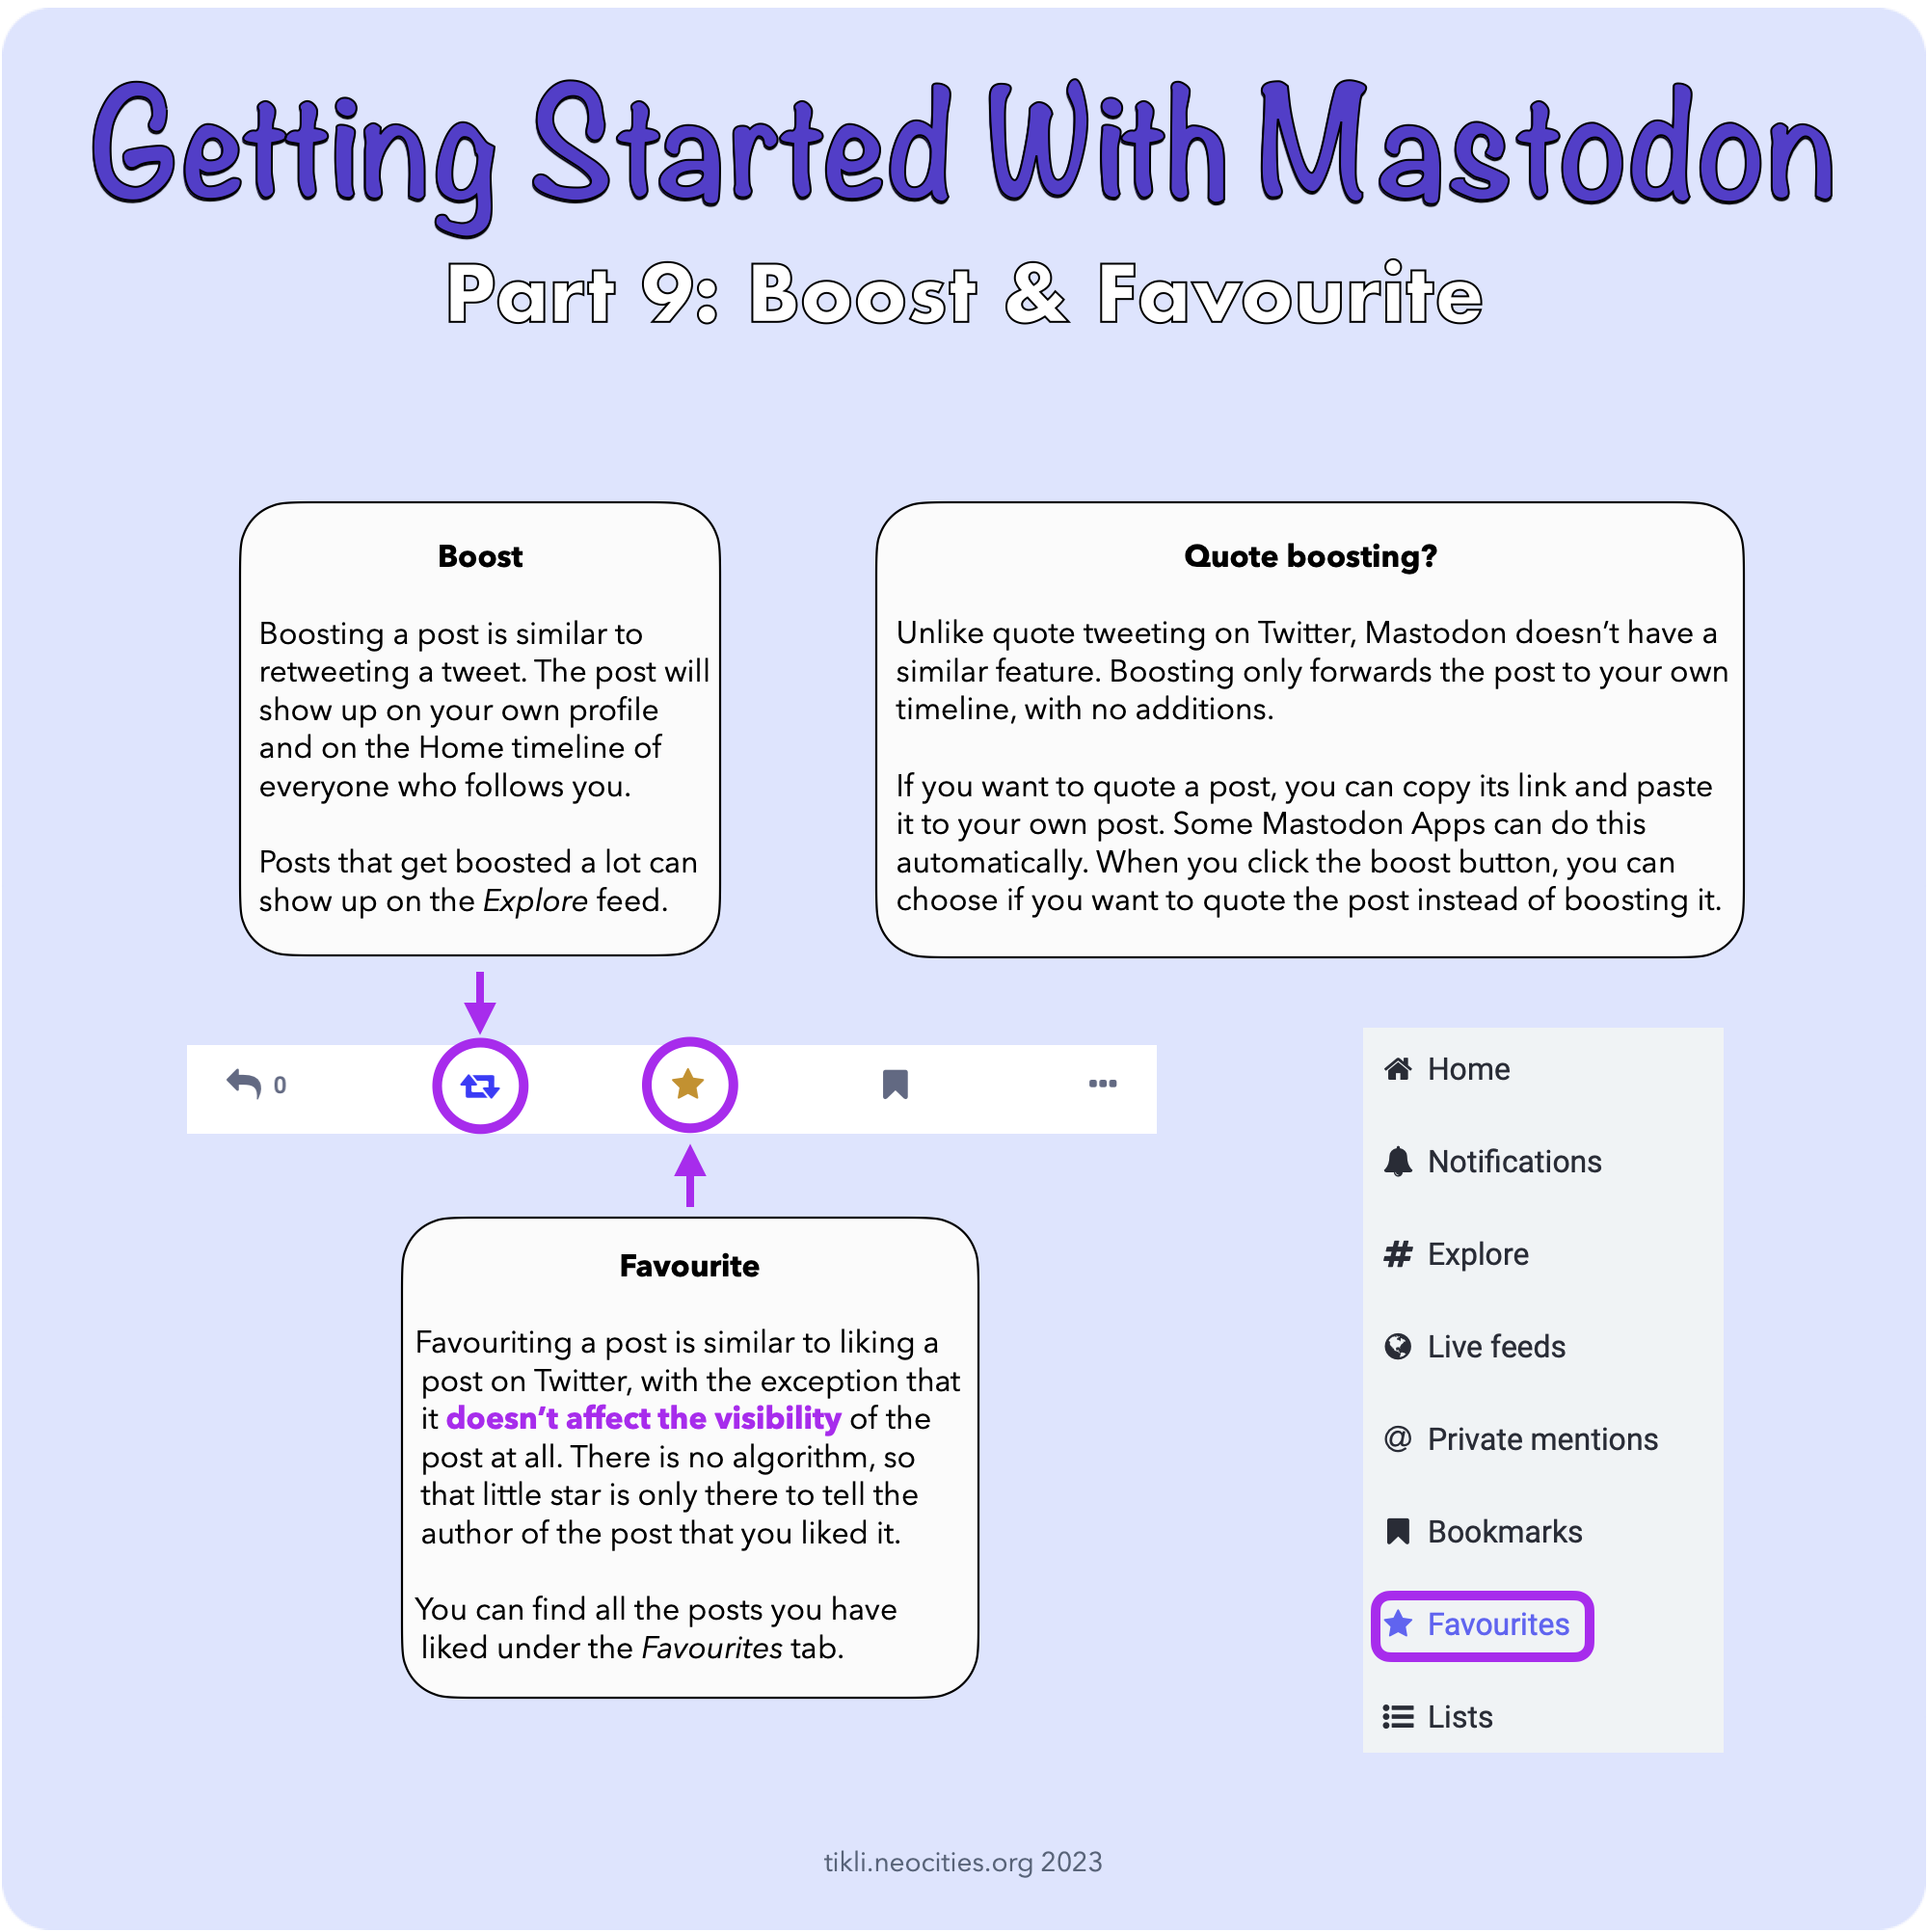
Boost (clockwise vertical arrows icon)
Boosting a post is similar to retweeting a tweet. The post will show up on your own profile and on the Home timeline of everyone who follows you.
Posts that get boosted a lot can show up on the Explore feed.
Favourite (star icon)
Favouriting a post is similar to liking a post on Twitter, with the exception that it doesn’t affect the visibility of the post at all. There is no algorithm, so that little star is only there to tell the author of the post that you liked it.
You can find all the posts you have liked under the Favourites tab.
Quote boosting?
Unlike quote tweeting on Twitter, Mastodon doesn’t have a similar feature. Boosting only forwards the post to your own timeline, with no additions.
If you want to quote a post, you can copy its link and paste it to your own post. Some Mastodon Apps can do this automatically. When you click the boost button, you can choose if you want to quote the post instead of boosting it.